[Android] SharedPreferences
아래 내용은 Android Developer 공식 문서 내용을 참고하여 작성한 자습 기록입니다.
📚Android 정리 - SharedPreferences
안드로이드에서 데이터를 저장할 수 있는 방법은 많이 있다. Room 라이브러리를 사용할 수도 있고, Firebase Database를 사용하는 방법, 아니면 따로 DB를 구축한 후 연동하여 데이터를 관리할 수 있다. 오늘은 그중에서도 저장하려는 키-값 데이터가 비교적 작은 경우 사용할 수 있는 SharedPreferences에 대해 알아보고자 한다.
SharedPreferences 객체는 키-값 쌍이 포함된 데이터를 저장하는 파일을 가리킨다. 따라서 키-값 쌍을 읽고 쓸 수 있는 간단한 메서드를 제공한다. SharedPreferences가 정확히 어떤 역할을 하는지 알아보고 사용법 또한 알아보자.
📔 SharedPreferences
SharedPreferences는 Context.getSharedPreferences(String, int)을 통해 반환된 데이터에 접근하고 수정하기 위한 인터페이스이다. 여기서 반환된 데이터들은 키-값 쌍의 형식을 갖고 있다. 이러한 preferences를 위해 모든 사용자가 공유하는 클래스의 인스턴스를 제공한다. preferences에 대한 수정을 위해서는 preference의 값들이 일관된 상태로 유지되고 저장소에 커밋되는 시기를 제어할 수 있도록 Editor 객체를 거쳐야 한다. SharedPreferences는 다양한 get 메서드에서(getBoolean, getInt 등) 개체를 반환하는데, 이 개체는 변경할 수 없는 값으로 처리되어야 한다.
⚠️ 중요 - SharedPreferences 사용 주의사항
SharedPreferences는 저장된 값에 대한 모든 변경 사항이 동일한 값에 액세스하는 모든 사용자에게 즉각적이고 똑같이 표시되기 때문에 강력한 일관성을 제공한다. 예를 들어, 같은 데이터를 두 명의 사용자가 공유하고 있다고 가정했을 때, 한 명의 사용자가 기존의 값을 수정하면, 기존의 값을 검색하길 원했던 다른 사용자는 수정된 값을 보게 된다. 따라서, 값을 자주 변경해야 하는 데이터들은 SQLite 또는 Firebase와 같은 다른 저장소를 사용하도록 권장된다.
⚠️ 중요 - SharedPreferences API와 Preference API의 차이
SharedPreferences를 사용하는 데 있어 일반 Preference API와는 다른 개념이라는 것을 인지해야 한다. 앞서 말했지만 SharedPreferences는 저장소에 소량의 ‘키-값’ 데이터를 저장하는 데 사용되지만, 일반 Preference API는 앱의 설정 또는 기본 설정에 대한 사용자 UI를 구축하는 데 사용된다.
📔 SharedPreferences 사용하여 데이터 저장하기
서론이 길었으니 이제 본격적으로 데이터를 저장하는 방법을 알아보자. 값을 가져오기 위한 SharedPreferences 환경을 생성하는 방법으로는 아래와 같이 두 가지가 존재한다.
getSharedPreferences()- 첫 번째 인자 값으로 설정되는 이름을 통해preference를 구분할 수 있는 메서드로, 여러 개의 shared preference 파일이 필요한 경우 해당 메서드를 사용한다.getPreferences()- 오직 하나의 shared preference 파일이 필요한 경우 해당 메서드를 사용한다.getPreferences()메서드는 액티비티에 속한 기본 값으로 설정되어 있는 shared preference 파일을 검색하기 때문에 이름으로 따로 구분 지을 필요가 없다.
두 가지 방법 중, 먼저 getSharedPreferences()를 사용해 값을 저장해 보자.
📖 getSharedPreferences()로 값 저장
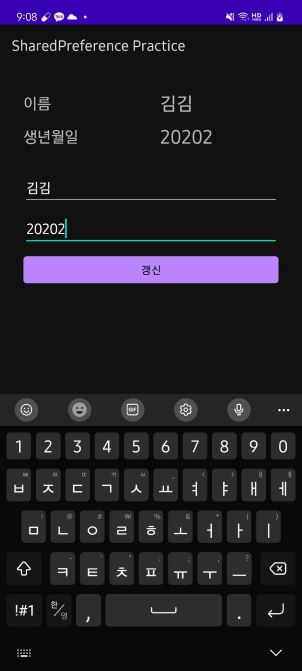
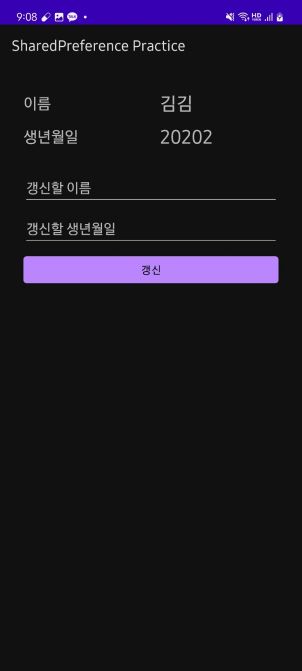
입력한 값을 저장하기 위해 먼저 이름과 생년월일을 EditText에 입력하고 버튼을 누르면, 텍스트 뷰로 값이 업데이트되는 UI를 간단하게 구현해 주었다.
<?xml version="1.0" encoding="utf-8"?>
<androidx.constraintlayout.widget.ConstraintLayout xmlns:android="http://schemas.android.com/apk/res/android"
    xmlns:app="http://schemas.android.com/apk/res-auto"
    xmlns:tools="http://schemas.android.com/tools"
    android:layout_width="match_parent"
    android:layout_height="match_parent"
    tools:context=".MainActivity">

    <TextView
        android:id="@+id/nameTextView"
        android:layout_width="wrap_content"
        android:layout_height="wrap_content"
        android:layout_marginStart="32dp"
        android:layout_marginTop="36dp"
        android:layout_marginEnd="16dp"
        android:text="이름"
        android:textSize="20sp"
        app:layout_constraintStart_toStartOf="parent"
        app:layout_constraintTop_toTopOf="parent" />

    <TextView
        android:id="@+id/nameValueTextView"
        android:layout_width="wrap_content"
        android:layout_height="wrap_content"
        android:text="아무개"
        android:textSize="24sp"
        app:layout_constraintBottom_toBottomOf="@id/nameTextView"
        app:layout_constraintEnd_toEndOf="parent"
        app:layout_constraintStart_toEndOf="@id/nameTextView"
        app:layout_constraintTop_toTopOf="@id/nameTextView" />

    <TextView
        android:id="@+id/birthTextView"
        android:layout_width="wrap_content"
        android:layout_height="wrap_content"
        android:layout_marginTop="16dp"
        android:text="생년월일"
        android:textSize="20sp"
        app:layout_constraintStart_toStartOf="@id/nameTextView"
        app:layout_constraintTop_toBottomOf="@id/nameTextView" />

    <TextView
        android:id="@+id/birthValueTextView"
        android:layout_width="wrap_content"
        android:layout_height="wrap_content"
        android:text="2017년 4월 17일"
        android:textSize="24sp"
        app:layout_constraintBottom_toBottomOf="@id/birthTextView"
        app:layout_constraintStart_toStartOf="@id/nameValueTextView"
        app:layout_constraintTop_toTopOf="@id/birthTextView" />

    <EditText
        android:id="@+id/nameInputEditText"
        android:layout_width="0dp"
        android:layout_height="wrap_content"
        android:layout_marginHorizontal="32dp"
        android:layout_marginTop="32dp"
        android:hint="갱신할 이름"
        app:layout_constraintEnd_toEndOf="parent"
        app:layout_constraintStart_toStartOf="parent"
        app:layout_constraintTop_toBottomOf="@id/birthTextView" />

    <EditText
        android:id="@+id/birthInputEditText"
        android:layout_width="0dp"
        android:layout_height="wrap_content"
        android:layout_marginHorizontal="32dp"
        android:layout_marginTop="8dp"
        android:hint="갱신할 생년월일"
        app:layout_constraintEnd_toEndOf="parent"
        app:layout_constraintStart_toStartOf="parent"
        app:layout_constraintTop_toBottomOf="@id/nameInputEditText" />

    <Button
        android:id="@+id/updateButton"
        android:layout_width="0dp"
        android:layout_height="wrap_content"
        android:layout_marginTop="8dp"
        android:text="갱신"
        app:layout_constraintEnd_toEndOf="@id/birthInputEditText"
        app:layout_constraintStart_toStartOf="@id/birthInputEditText"
        app:layout_constraintTop_toBottomOf="@id/birthInputEditText" />

</androidx.constraintlayout.widget.ConstraintLayout>
이제 값을 저장해 보자. 버튼을 클릭했을 때 동작하게 되므로 클릭 리스너 내부에 getSharedPreferences()를 사용하여 저장될 값을 담을 파일을 변수에 지정해 주었다. 인자 값은 두 개가 필요한데, 첫 번째 인자로는 preference를 구분할 이름을 설정해 주었고 두 번째 인자 값은 접근할 모드를 설정하는 것을 의미하므로 호출한 앱에서만 접근할 수 있도록 MODE_PRIVATE을 지정해 주었다.
val infoPreferences = getSharedPreferences("updateInfo", Context.MODE_PRIVATE)
값을 저장할 수 있게 하기 위해 .edit()을 사용해 설정할 수 있는 상태로 만들어 주었다. 해당 메서드는 현재 preference의 에디터를 호출한다. 에디터 내에서 이름과 생년월일을 putString()과 putInt()를 사용해 저장해 준다. 여기서 각각의 인자로 들어가는 값들은 키와 값의 쌍으로, ‘이름값을 구별할 수 있는 키’와 ‘이름값’ 그리고 ‘생년월일 값을 구별할 수 있는 키’와 ‘생년월일 값’을 인자로 넣어주었다. 각각의 값들을 저장하고 난 뒤에 apply() 또는 commit()을 호출해 주어야 위의 내용들을 적용시킬 수 있다. 여기서 둘의 차이는 apply()는 비동기적으로 적용하는 반면, commit()은 동기적으로 적용한다. 중요한 점은 commit()을 메인(UI) 스레드에서 사용하는 것은 되도록 피해야 한다. ANR을 발생시킬 수도 있기 때문이다.
with(infoPreferences.edit()) {
    putString("name", nameValue)
    putInt("birth", birthValue.toInt())
    apply()
}
이제 저장된 값을 가져와 보자. 먼저 값이 저장되어 있는 preference 파일을 앞서 지정했던 키값으로 가져와 변수에 넣어 주었다. 그 후 위와 마찬가지로 getString()과 getInt()를 사용해 저장된 값을 가져온다. 여기서 필요한 인자는 저장된 값의 ‘키’와 ‘값이 없을 경우 적용할 기본 값’이다. 알맞은 인자를 넣어준 뒤 가져온 값들을 텍스트 뷰에 표시해 주면 된다.
val infoPreferences = getSharedPreferences("updateInfo", Context.MODE_PRIVATE)

nameTextView.text = infoPreferences.getString("name", "")
birthTextView.text = infoPreferences.getInt("birth", 0).toString()
결과를 보면 입력한 값이 잘 저장되고, 앱을 다시 시작했을 때에도 값이 유지되고 있는 것을 볼 수 있다.


위 내용의 전체 코드는 다음과 같다.
class MainActivity : AppCompatActivity() {

    private val nameTextView: TextView by lazy {
        findViewById(R.id.nameValueTextView)
    }
    private val birthTextView: TextView by lazy {
        findViewById(R.id.birthValueTextView)
    }
    private val nameEditText: EditText by lazy {
        findViewById(R.id.nameInputEditText)
    }
    private val birthEditText: EditText by lazy {
        findViewById(R.id.birthInputEditText)
    }

    override fun onCreate(savedInstanceState: Bundle?) {
        super.onCreate(savedInstanceState)
        setContentView(R.layout.activity_main)

        update()

        val updateButton = findViewById<Button>(R.id.updateButton)
        updateButton.setOnClickListener {
            val nameValue = nameEditText.text.toString()
            val birthValue = birthEditText.text.toString()

            nameTextView.text = nameValue
            birthTextView.text = birthValue

            val infoPreferences = getSharedPreferences("updateInfo", Context.MODE_PRIVATE)

            with(infoPreferences.edit()) {
                putString("name", nameValue)
                putInt("birth", birthValue.toInt())
                apply()
            }
        }
    }

    private fun update() {
        val infoPreferences = getSharedPreferences("updateInfo", Context.MODE_PRIVATE)

        nameTextView.text = infoPreferences.getString("name", "")
        birthTextView.text = infoPreferences.getInt("birth", 0).toString()
    }
}
📖 getPreferences()로 값 저장
이제 getPreferences()를 사용해 값을 저장해 보자. 정말 간단하다. 위의 내용에서 getSharedPreferences를 getPreferences로 바꿔주고 인자가 하나만 필요하므로 인 값으로 접근할 모드만 지정해 주자.
val infoPreferences = getPreferences(Context.MODE_PRIVATE)