[Android] Part2-Github Repository 앱
아래 내용은 패스트 캠퍼스 [35개 프로젝트로 배우는 Android 앱 개발 feat. Jetpack Compose]의 강의 내용을 기반으로 작성한 자습 기록입니다.
Github Repository 앱
ℹ️앱 설명
깃 허브의 사용자를 검색할 수 있고 해당 사용자의 레포지토리를 조회 및 검색할 수 있는 앱
✅구현 기능
- Retrofit 라이브러리를 사용하여 깃허브 API 접근
- 깃허브 사용자 검색
- 깃허브 레포지토리 접근
- RecyclerView를 사용하여 사용자 및 레포지토리 조회
- Intent를 사용하여 레포지토리 URL 검색
✅사용되는 기능
- Android
- Retrofit
- RecyclerView
- ListAdapter
- Handler
- API
- Github Open API
📔 Retrofit을 이용해 특정 사용자 레포지토리 불러오기
먼저 Retrofit을 사용하기 앞서 Retrofit과 Gson 라이브러리를 위한 의존성을 추가한다.
app:build.gradle
implementation 'com.squareup.retrofit2:retrofit:2.9.0'
implementation 'com.squareup.retrofit2:converter-gson:2.9.0'
MainActivity에서 Retrofit을 사용하기 위해 Builder를 정의한다. baseUrl() 메서드의 인자로 데이터를 가져오는 데 사용되는 URL인 https://api.github.com 주소를 인자로 넣어주고, addConverterFactory() 메서드에 GsonConvertorFactory를 넣어준다. 여기서 GsonConvertorFactory는 구글에서 제공하는 어댑터로, 데이터를 수동으로 직렬화나 역직렬화할 필요 없이 Retrofit이 JSON 데이터를 코틀린 객체로 또는 그 반대로 자동 변환할 수 있도록 지원한다. 두 가지 메서드를 통해 Retrofit 설정을 추가해 주고 마지막에 build() 메서드를 호출하여 Retrofit을 사용할 준비가 되었음을 명시한다.
MainActivity.kt
val retrofit = Retrofit.Builder()
    .baseUrl("https://api.github.com/")
    .addConverterFactory(GsonConverterFactory.create())
    .build()
다음으로 서버의 데이터를 가져와 GsonConvertorFactory를 통해 객체로 변환할 수 있도록 하기 위한 데이터 클래스가 필요하다. 따라서 Repo라는 이름의 데이터 클래스를 생성해 준다. Repo 클래스 내부에는 Json 데이터에서 내려주는 키값과 연결하기 위해 @SerializedName 어노테이션을 사용한다. 어노테이션 내부에 해당하는 Json 데이터의 키값의 이름을 작성해 주면, 변수명은 자유롭게 지정해도 좋다. 따라서 검색할 항목들을 데이터 클래스의 변수로 지정해 준다.
Repo.kt
data class Repo(
    @SerializedName("id")
    val id: Long,
    @SerializedName("name")
    val name: String,
    @SerializedName("description")
    val description: String,
    @SerializedName("language")
    val language: String?,
    @SerializedName("stargazers_count")
    val starCount: Int,
    @SerializedName("forks_count")
    val forkCount: Int,
    @SerializedName("html_url")
    val htmlUrl: String,
)
다음으로 데이터 클래스의 속성들에 값을 부여하기 위한 쿼리문이 작성된 인터페이스를 생성한다. 우선 특정 유저의 레포지토리를 조회하는 메서드를 작성해 준다. 해당 메서드의 반환형은 깃허브 API 홈페이지에 작성된 반환 예시를 보면 알 수 있듯이 배열 형태로 감싸져 있는 모양이므로 Call 인터페이스를 호출한 뒤 Repo 데이터 클래스의 리스트 형인 List<Repo>를 인자로 넣어준다.
GithubService.kt
interface GithubService {
    @GET("users/{username}/repos")
    fun listRepos(@Path("username") username: String): Call<List<Repo>>
}
이제 MainActivity에서 Retrofit을 생성한 뒤 데이터를 가져오도록 하자. 앞서 생성해 두었던 “retrofit” 변수를 create()을 통해 Retrofit을 생성해 주고 “githubService”라는 변수명으로 선언해 주었다. 이후 해당 변수명을 통해 선언해 두었던 GithubService 인터페이스의 메서드를 통해 데이터를 가져오면 된다. enqueue() 메서드를 사용해 비동기적으로 요청 값을 보낸 뒤 Callback으로 응답이 성공적으로 이루어졌을 때 반환하는 onResponse() 메서드와 반대로 실패했을 때 받아오는 onFailure() 메서드를 재정의하여 받아온 데이터를 처리한다. 따라서 전자에는 우선 로그를 통해 요청 값을 확인하도록, 후자는 printStackTrace()를 통해 실패한 원인을 추적하도록 해주었다.
MainActivity.kt
val githubService = retrofit.create(GithubService::class.java)
githubService.listRepos("square").enqueue(object: Callback<List<Repo>> {
    override fun onResponse(call: Call<List<Repo>>, response: Response<List<Repo>>) {
        Log.e("MainActivity", response.body().toString())
    }

    override fun onFailure(call: Call<List<Repo>>, t: Throwable) {
        Toast.makeText(this@MainActivity, "오류가 발생했습니다.", Toast.LENGTH_SHORT).show()
        t.printStackTrace()
    }
})
다음과 같이 실행 시 성공적으로 요청 값을 받아온 것을 로그를 통해 확인할 수 있다.

📔 Retrofit을 이용해 사용자 검색하기
이번에는 Retrofit을 사용해 사용자를 검색해 보도록 하자. 레포지토리를 받아왔을 때와 동일하게 사용자를 받아오기 위한 데이터 클래스를 생성해 준다. 다만 레포지토리에서는 데이터가 리스트 형태로 먼저 감싸진 반면, 사용자 검색 시에는 먼저 객체로 감싸고 그 뒤에 리스트 형태로 사용자 값을 보내는 것을 볼 수 있다.
레포지토리 값을 가져오는 데이터
[ // 리스트
  {
    "id": 1296269,
    "node_id": "MDEwOlJlcG9zaXRvcnkxMjk2MjY5",
    "name": "Hello-World",
    "full_name": "octocat/Hello-World",
    "owner": {
      "login": "octocat",
      "id": 1,
      ...
  }
]
사용자 값을 가져오는 데이터
{
  "total_count": 12,
  "incomplete_results": false,
  "items": [ // 리스트
    {
      "login": "mojombo",
      "id": 1,
      ...
    }
  ]
}
따라서 데이터 클래스를 생성할 때 상위의 데이터를 먼저 가져오는 UserDto와 사용자에 대한 데이터를 가져오는 User로 나누어 생성해 주었다.
UserDto.kt
data class UserDto(
    @SerializedName("total_count")
    val totalCount: Int,
    @SerializedName("items")
    val items: List<User>
)
User.kt
data class User(
    @SerializedName("id")
    val id: Int,
    @SerializedName("login")
    val username: String
)
GithubService 클래스에서 사용자 검색을 위한 쿼리를 작성한 searchUsers() 메서드를 작성한다. 반환값은 UserDto이다.
GithubService.kt
interface GithubService {

    ...

    @GET("search/users")
    fun searchUsers(@Query("q") query: String): Call<UserDto>

}
MainActivity에서 “githubService”를 통해 사용자 검색 메서드를 실행시킨다. 위에서 했던 것과 마찬가지로 우선 로그 값을 통해 데이터가 잘 들어오는지 확인해 준다.
MainActivity.kt
class MainActivity : AppCompatActivity() {
    private lateinit var binding: ActivityMainBinding

    override fun onCreate(savedInstanceState: Bundle?) {
        super.onCreate(savedInstanceState)
        binding = ActivityMainBinding.inflate(layoutInflater)
        setContentView(binding.root)

        val retrofit = Retrofit.Builder()
            .baseUrl("https://api.github.com/")
            .addConverterFactory(GsonConverterFactory.create())
            .build()

        val githubService = retrofit.create(GithubService::class.java)

        ...

        githubService.searchUsers("becomeproo").enqueue(object : Callback<UserDto> {
            override fun onResponse(call: Call<UserDto>, response: Response<UserDto>) {
                Log.e("MainActivity", response.body().toString())
            }

            override fun onFailure(call: Call<UserDto>, t: Throwable) {
                Log.e("MainActivity", "Call Failed")
                t.printStackTrace()
            }
        })
    }
}
데이터가 잘 들어온 것을 확인할 수 있다.

📔 검색된 사용자 데이터를 RecyclerView에 구현
가져온 사용자 데이터를 RecyclerView에 띄워보도록 하자. 우선 activity_main.xml에서 나중에 사용자 이름을 검색하여 띄울 것이기 때문에 이를 입력받기 위한 EditText와 RecyclerView를 선언해 준다.
activity_main.xml
<?xml version="1.0" encoding="utf-8"?>
<androidx.constraintlayout.widget.ConstraintLayout xmlns:android="http://schemas.android.com/apk/res/android"
    xmlns:app="http://schemas.android.com/apk/res-auto"
    xmlns:tools="http://schemas.android.com/tools"
    android:layout_width="match_parent"
    android:layout_height="match_parent"
    android:padding="16dp"
    tools:context=".MainActivity">

    <EditText
        android:id="@+id/searchEditText"
        android:layout_width="0dp"
        android:layout_height="wrap_content"
        app:layout_constraintStart_toStartOf="parent"
        app:layout_constraintEnd_toEndOf="parent"
        app:layout_constraintTop_toTopOf="parent" />

    <androidx.recyclerview.widget.RecyclerView
        android:id="@+id/userRecyclerView"
        android:layout_width="0dp"
        android:layout_height="0dp"
        tools:listitem="@layout/item_user"
        app:layout_constraintStart_toStartOf="parent"
        app:layout_constraintEnd_toEndOf="parent"
        app:layout_constraintTop_toBottomOf="@id/searchEditText"
        app:layout_constraintBottom_toBottomOf="parent" />

</androidx.constraintlayout.widget.ConstraintLayout>
다음으로 RecyclerView에 표시될 아이템 뷰를 생성해 준다. item_user라는 이름의 리소스 파일을 생성해 주고 사용자의 이름만 입력받을 것이므로 TextView 하나와 구분하기 원활하도록 ConstraintLayout에 padding 값을 추가해 주었다.
item_user.xml
<?xml version="1.0" encoding="utf-8"?>
<androidx.constraintlayout.widget.ConstraintLayout xmlns:android="http://schemas.android.com/apk/res/android"
    xmlns:app="http://schemas.android.com/apk/res-auto"
    xmlns:tools="http://schemas.android.com/tools"
    android:layout_width="match_parent"
    android:layout_height="wrap_content"
    android:padding="16dp">

    <TextView
        android:id="@+id/usernameTextView"
        android:layout_width="0dp"
        android:layout_height="wrap_content"
        android:textColor="@color/black"
        android:textSize="20sp"
        android:textStyle="bold"
        app:layout_constraintBottom_toBottomOf="parent"
        app:layout_constraintEnd_toEndOf="parent"
        app:layout_constraintStart_toStartOf="parent"
        app:layout_constraintTop_toTopOf="parent"
        tools:text="This is User's name" />

</androidx.constraintlayout.widget.ConstraintLayout>
뷰에 띄우기 위한 준비를 마쳤으니 이제 데이터와 뷰를 연결시킬 Adapter 클래스를 생성해 준다. UserAdapter라는 이름의 클래스를 생성해 ListAdapter를 상속받도록 한다. DiffUtil 클래스에서 areItemsTheSame() 메서드에서는 사용자의 id 값을 통해 같은 객체인지 구분하고, areContentsTheSame()에서는 내용의 동일 여부를 판단한다. ViewHolder는 User 데이터 클래스를 갖는 UserViewHolder로 생성해 주었고 내부에 bind() 메서드를 선언하여 사용자의 이름을 연결시켜 주도록 했다. ListAdapter를 상속받았으므로 onCreateViewHolder()에서는 UserViewHolder를 반환하도록, onBindViewHolder()에서는 각각의 데이터를 연결시키도록 해 주었다.
UserAdapter.kt
class UserAdapter : ListAdapter<User, UserAdapter.UserViewHolder>(diffUtil) {

    override fun onCreateViewHolder(parent: ViewGroup, viewType: Int): UserViewHolder {
        return UserViewHolder(
            ItemUserBinding.inflate(
                LayoutInflater.from(parent.context),
                parent,
                false
            )
        )
    }

    override fun onBindViewHolder(holder: UserViewHolder, position: Int) {
        holder.bind(currentList[position])
    }

    inner class UserViewHolder(private val binding: ItemUserBinding) : RecyclerView.ViewHolder(binding.root) {
        fun bind(item: User) {
            binding.usernameTextView.text = item.username
        }
    }

    companion object {
        val diffUtil = object: DiffUtil.ItemCallback<User>() {
            override fun areItemsTheSame(oldItem: User, newItem: User): Boolean {
                return oldItem.id == newItem.id
            }

            override fun areContentsTheSame(oldItem: User, newItem: User): Boolean {
                return oldItem == newItem
            }
        }
    }
}
마지막으로 MainActivity에서 Adapter를 연결시켜주기만 하면 된다. UserAdapter를 “userAdapter”라는 이름의 클래스 변수로 지정해 주었고, 사용자를 검색하는 메서드 위에 RecyclerView를 정의함과 동시에 Adapter를 연결시켜 주었다. 사용자 검색 요청을 받는 메서드 내부에서 성공적으로 데이터를 받아왔을 경우, “userAdapter”에 데이터를 추가시켜줄 수 있도록 한다.
MainActivity.kt
class MainActivity : AppCompatActivity() {

    ...

    private lateinit var userAdapter: UserAdapter

    override fun onCreate(savedInstanceState: Bundle?) {

        ...

        userAdapter = UserAdapter()

        binding.userRecyclerView.apply {
            layoutManager = LinearLayoutManager(context)
            adapter = userAdapter
        }

        githubService.searchUsers("square").enqueue(object : Callback<UserDto> {
            override fun onResponse(call: Call<UserDto>, response: Response<UserDto>) {
                userAdapter.submitList(response.body()?.items)
            }

            override fun onFailure(call: Call<UserDto>, t: Throwable) {
                Log.e("MainActivity", "Call Failed")
                t.printStackTrace()
            }
        })

    }
}
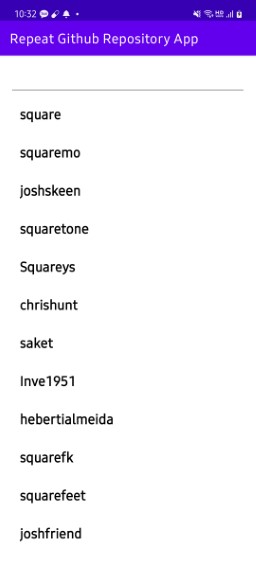
📔 검색창에 입력하여 사용자 검색
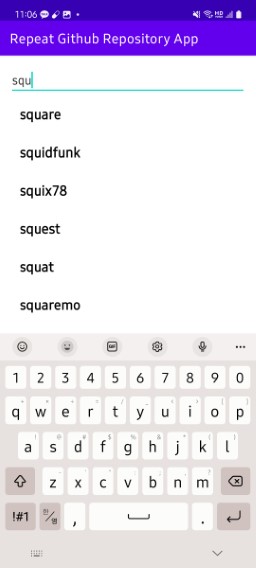
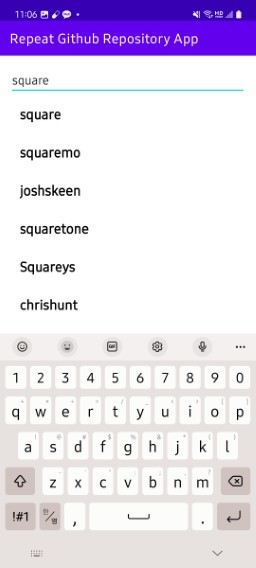
위에서는 “square”라는 단어를 미리 띄워 검색한 반면, 직접 기기에서 입력할 때마다 사용자가 검색되도록 구현해 보자. 이를 위해 MainActivity에서 EditText의 addTextChangedListener를 사용한다. 그전에 먼저 입력 값을 받을 “inputSearchUser” 변수를 널 값으로 초기화하여 클래스 변수로 지정해 두었다. 뷰 바인딩을 통해 activity_main의 “searchEditText”를 가져와 addTextChangedListener를 선언해 준다. 내부에서 앞서 정의한 “inputSearchUser” 변수에 입력된 값을 지정해 준다. 이렇게 하면 검색창에 값이 입력될 때마다 사용자의 이름을 검색하여 RecyclerView에 이름이 표시된다.
하지만 여러 번 입력하여 검색할 경우, 부여받은 토큰 값을 초과하여 검색이 제한될 수 있다. 따라서 입력될 때마다 검색하는 것이 아닌 특정 초마다 입력받은 값을 검색하도록 해야 하는데 이러한 방법을 debouncing(디바운싱)이라고 한다. 보통 debounce의 경우 RxJava 또는 Coroutine을 사용해 구현하지만 아직 둘에 대해 사용하는 방법을 모르니 Handler를 사용해 구현해 보도록 한다. 다만 이 방법이 효율적인 방법은 아니니 이 점을 유의하여 구현해 보도록 하자.
클래스 변수로 먼저 Handler를 생성해 준다. 또한 기존 사용자 검색을 위한 구문을 메서드로 변환해 주고 Runnable 객체를 만들어 해당 객체의 내부에서 메서드를 호출할 수 있도록 해준다. 이후 addTextChangedListener 내부에서 Handler의 removeCallbacks()를 호출해 기존 입력된 정보를 지워주고 postDelayed()를 사용해 Runnable 객체를 호출하도록 한다. 이렇게 디바운싱하여 특청 초마다 끊어 입력 값을 검색해 지정받은 토큰을 낭비하지 않을 수 있게 된다.
MainActivity.kt
class MainActivity : AppCompatActivity() {

    ...

    private val handler = Handler(Looper.getMainLooper())
    private var inputSearchUser = ""

    override fun onCreate(savedInstanceState: Bundle?) {

        ...

        val runnable = Runnable {
            searchUser(inputSearchUser)
        }

        binding.searchEditText.addTextChangedListener {
            inputSearchUser = it.toString()

            handler.removeCallbacks(runnable)
            handler.postDelayed(runnable, 500)
        }

    }

    private fun searchUser(query: String) {
        val githubService = retrofit.create(GithubService::class.java)
        githubService.searchUsers(query).enqueue(object : Callback<UserDto> {
            override fun onResponse(call: Call<UserDto>, response: Response<UserDto>) {
                userAdapter.submitList(response.body()?.items)
            }

            override fun onFailure(call: Call<UserDto>, t: Throwable) {
                Toast.makeText(this@MainActivity, "에러가 발생했습니다.", Toast.LENGTH_SHORT).show()
                t.printStackTrace()
            }
        })
    }
}
📔 검색한 사용자의 레포지토리 조회
위에서 검색한 사용자의 영역을 클릭했을 때 다른 액티비티로 이동해 해당 사용자의 레포지토리를 조회하는 기능을 구현해 보자.
먼저 사용자의 영역을 클릭했을 때 다른 액티비티로 이동하는 것부터 구현한다. UserAdapter에서 속성값으로 “onClick” 메서드를 받도록 추가해 주고, UserViewHolder 클래스의 bind() 메서드에서 setOnClickListener를 구현해 해당 블록 내부에서 받아온 onClick() 메서드를 실행하도록 한다.
UserAdapter.kt
class UserAdapter(
    val onClick: (User) -> Unit
) : ListAdapter<User, UserAdapter.UserViewHolder>(diffUtil) {

    ...

    inner class UserViewHolder(private val binding: ItemUserBinding) : RecyclerView.ViewHolder(binding.root) {
        fun bind(item: User) {

            ...

            binding.root.setOnClickListener {
                onClick(item)
            }
        }
    }

    ...

}
MainActivity로 와서 UserAdapter의 생성자가 있는 부분에서 메서드를 구현하여 다시 정의해 준다. 메서드 내용은 사용자 이름을 넣어 새로운 액티비티로 보내야 하므로 Intent를 사용하여 구현해 준다. 여기서 레포지토리가 조회될 액티비티의 이름은 RepoActivity이다.
MainActivity.kt
userAdapter = UserAdapter {
    val intent = Intent(this, RepoActivity::class.java)
        .putExtra("username", it.username)
    startActivity(intent)
}
RepoActivity를 추가로 생성했다면 activity_repo.xml 파일에서 사용자의 이름을 표시할 TextView와 레포지토리들을 표시할 RecyclerView로 뷰를 구성한다.
activity_repo.xml
<?xml version="1.0" encoding="utf-8"?>
<androidx.constraintlayout.widget.ConstraintLayout xmlns:android="http://schemas.android.com/apk/res/android"
    xmlns:app="http://schemas.android.com/apk/res-auto"
    xmlns:tools="http://schemas.android.com/tools"
    android:layout_width="match_parent"
    android:layout_height="match_parent"
    tools:context=".RepoActivity">

    <TextView
        android:id="@+id/usernameTextView"
        android:layout_width="0dp"
        android:layout_height="wrap_content"
        android:padding="16dp"
        android:textColor="@color/black"
        android:textSize="28sp"
        android:textStyle="bold"
        app:layout_constraintEnd_toEndOf="parent"
        app:layout_constraintStart_toStartOf="parent"
        app:layout_constraintTop_toTopOf="parent"
        tools:text="This is User's name" />

    <androidx.recyclerview.widget.RecyclerView
        android:id="@+id/repoRecyclerView"
        android:layout_width="0dp"
        android:layout_height="0dp"
        app:layout_constraintBottom_toBottomOf="parent"
        app:layout_constraintEnd_toEndOf="parent"
        app:layout_constraintStart_toStartOf="parent"
        app:layout_constraintTop_toBottomOf="@id/usernameTextView"
        tools:listitem="@layout/item_repo" />

</androidx.constraintlayout.widget.ConstraintLayout>
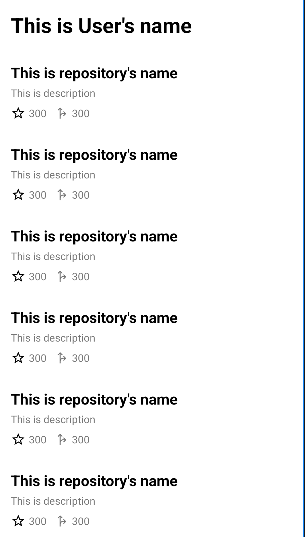
다음으로 레포지토리들을 표시하기 위해 item_repo.xml 파일을 새로 생성해 주고, 레포지토리의 이름, 설명 등의 속성들이 표시되도록 적절히 설정해 주었다.
item_repo.xml
<?xml version="1.0" encoding="utf-8"?>
<androidx.constraintlayout.widget.ConstraintLayout xmlns:android="http://schemas.android.com/apk/res/android"
    xmlns:app="http://schemas.android.com/apk/res-auto"
    xmlns:tools="http://schemas.android.com/tools"
    android:layout_width="match_parent"
    android:layout_height="wrap_content"
    android:padding="16dp">

    <TextView
        android:id="@+id/repoNameTextView"
        android:layout_width="0dp"
        android:layout_height="wrap_content"
        android:textColor="@color/black"
        android:textSize="20sp"
        android:textStyle="bold"
        app:layout_constraintStart_toStartOf="parent"
        app:layout_constraintTop_toTopOf="parent"
        tools:text="This is repository's name" />

    <TextView
        android:id="@+id/descriptionTextView"
        android:layout_width="0dp"
        android:layout_height="wrap_content"
        android:layout_marginTop="4dp"
        app:layout_constraintStart_toStartOf="@id/repoNameTextView"
        app:layout_constraintTop_toBottomOf="@id/repoNameTextView"
        tools:text="This is description" />

    <ImageView
        android:id="@+id/starImageView"
        android:layout_width="20dp"
        android:layout_height="20dp"
        android:src="@drawable/ic_baseline_star_outline_24"
        app:layout_constraintBottom_toBottomOf="@id/starTextView"
        app:layout_constraintStart_toStartOf="@id/repoNameTextView"
        app:layout_constraintTop_toTopOf="@id/starTextView" />

    <TextView
        android:id="@+id/starTextView"
        android:layout_width="wrap_content"
        android:layout_height="wrap_content"
        android:layout_marginStart="4dp"
        android:layout_marginTop="8dp"
        app:layout_constraintStart_toEndOf="@id/starImageView"
        app:layout_constraintTop_toBottomOf="@id/descriptionTextView"
        tools:text="300" />

    <ImageView
        android:id="@+id/forkImageView"
        android:layout_width="20dp"
        android:layout_height="20dp"
        android:layout_marginStart="10dp"
        android:src="@drawable/fork_right"
        app:layout_constraintBottom_toBottomOf="@id/starTextView"
        app:layout_constraintStart_toEndOf="@id/starTextView"
        app:layout_constraintTop_toTopOf="@id/starTextView" />

    <TextView
        android:id="@+id/forkTextView"
        android:layout_width="wrap_content"
        android:layout_height="wrap_content"
        android:layout_marginStart="4dp"
        app:layout_constraintStart_toEndOf="@id/forkImageView"
        app:layout_constraintTop_toTopOf="@id/starTextView"
        tools:text="300" />

</androidx.constraintlayout.widget.ConstraintLayout>
표시될 activity_repo.xml 파일의 모습은 다음과 같다.
앞선 과정과 마찬가지로 Adapter 클래스를 새로 생성해 구현한다. 위의 내용과 인자로 들어가는 클래스를 제외하고 모두 같으므로 설명은 생략하도록 한다.
RepoAdapter.kt
class RepoAdapter : ListAdapter<Repo, RepoAdapter.RepoViewHolder>(diffUtil) {

    override fun onCreateViewHolder(parent: ViewGroup, viewType: Int): RepoViewHolder {
        return RepoViewHolder(
            ItemRepoBinding.inflate(
                LayoutInflater.from(parent.context),
                parent,
                false
            )
        )
    }

    override fun onBindViewHolder(holder: RepoViewHolder, position: Int) {
        holder.bind(currentList[position])
    }

    inner class RepoViewHolder(private val binding: ItemRepoBinding) : RecyclerView.ViewHolder(binding.root) {
        fun bind(item: Repo) {
            binding.repoNameTextView.text = item.name
            binding.descriptionTextView.text = item.description
            binding.starTextView.text = item.starCount.toString()
            binding.forkTextView.text = item.forkCount.toString()
        }
    }

    companion object {
        val diffUtil = object : DiffUtil.ItemCallback<Repo>() {
            override fun areItemsTheSame(oldItem: Repo, newItem: Repo): Boolean {
                return oldItem.id == newItem.id
            }

            override fun areContentsTheSame(oldItem: Repo, newItem: Repo): Boolean {
                return oldItem == newItem
            }
        }
    }
}
MainActivity에서 Intent를 통해 받아온 사용자 이름을 사용해 레포지토리들을 조회한다. 해당 과정에서 앞서 만들어 두었던 레포지토리 조회 메서드인 listRepos()를 가져온다. 가져온 메서드는 listRepo() 라는 이름의 메서드에 넣어주었다. 뿐만 아니라 사용자 이름과 RecyclerView도 연결시켜 주도록 한다.
RepoActivity.kt
class RepoActivity : AppCompatActivity() {
    private lateinit var binding: ActivityRepoBinding
    private lateinit var repoAdapter: RepoAdapter

    private val retrofit = Retrofit.Builder()
        .baseUrl("https://api.github.com/")
        .addConverterFactory(GsonConverterFactory.create())
        .build()


    override fun onCreate(savedInstanceState: Bundle?) {
        super.onCreate(savedInstanceState)
        binding = ActivityRepoBinding.inflate(layoutInflater)
        setContentView(binding.root)

        val username = intent.getStringExtra("username") ?: return
        binding.usernameTextView.text = username

        repoAdapter = RepoAdapter()

        binding.repoRecyclerView.apply {
            layoutManager = LinearLayoutManager(context)
            adapter = repoAdapter
        }

        listRepo(username)
    }

    private fun listRepo(username: String) {
        val githubService = retrofit.create(GithubService::class.java)
        githubService.listRepos(username).enqueue(object : Callback<List<Repo>> {
            override fun onResponse(call: Call<List<Repo>>, response: Response<List<Repo>>) {
                Log.e("MainActivity", response.body().toString())
                repoAdapter.submitList(response.body())
            }

            override fun onFailure(call: Call<List<Repo>>, t: Throwable) {
                Toast.makeText(this@RepoActivity, "오류가 발생했습니다.", Toast.LENGTH_SHORT).show()
                t.printStackTrace()
            }
        })
    }
}
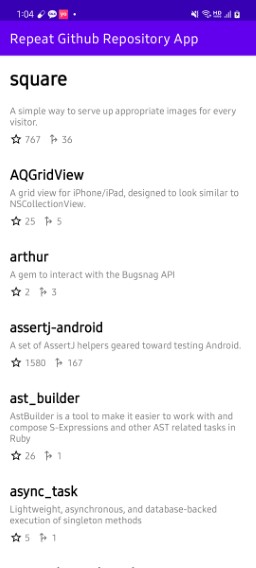
검색한 사용자의 레포지토리가 잘 조회된 것을 볼 수 있다.
📔 페이징 처리
사용자의 레포지토리를 보기 위해 스크롤를 계속 내려보니 30개의 레포지토리만 보이고 그 이상은 보이지 않았다. api에서 페이지 당 30개만 보이도록 제공하기 때문에 이후 레포지토리는 페이징 처리를 해주어야 한다.
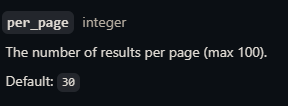
RepoActivity에서 클래스 변수 두 개를 먼저 선언해 준다. “page”는 0으로, “hasMore”는 true로 각각 초기화해주었다.
RepoActivity.kt
class RepoActivity : AppCompatActivity() {

    ...

    private var page = 0
    private var hasMore = true

    ...

}
페이징 처리를 위해서 LinearLayoutManager를 사용한다. 이를 위해 apply 함수로 초기화되어 있던 linearLayoutManager를 따로 빼주어 변수로 새로 지정해 준다. RecyclerView의 addOnScrollListener를 통해 onScrolled() 메서드를 재정의 해주고 여기서 “linearLayoutManager”에서 아이템의 개수를 나타내는 itemCount와 마지막 아이템의 위치를 반환하는 findLastVisibleItemPosition을 사용해 각각 변수에 지정해 주었다.
class RepoActivity : AppCompatActivity() {

    ...

    override fun onCreate(savedInstanceState: Bundle?) {

        ...

        val linearLayoutManager = LinearLayoutManager(this)

        binding.repoRecyclerView.layoutManager = linearLayoutManager
        binding.repoRecyclerView.adapter = repoAdapter
        binding.repoRecyclerView.addOnScrollListener(object: RecyclerView.OnScrollListener() {
            override fun onScrolled(recyclerView: RecyclerView, dx: Int, dy: Int) {
                super.onScrolled(recyclerView, dx, dy)

                val totalCount = linearLayoutManager.itemCount
                val lastVisiblePosition = linearLayoutManager.findLastVisibleItemPosition()
            }
        })
    }
}
Json으로 받은 데이터의 개수가 딱 30개로 맞아떨어질 경우는 이후 아이템이 더 존재한다는 것으로 가정한다. 이를 “hasMore” 변수에 지정해 주고, repoAdapter에도 누적되어 추가되도록 지정해 준다. 또한 페이지에 따라 처리하게 되므로 page를 매개변수로 지정해 주고, GithubService의 listRepos() 메서드도 이에 맞게 변경해 주도록 한다.
private fun listRepo(username: String, page: Int) {

    ...

    githubService.listRepos(username, page).enqueue(object : Callback<List<Repo>> {
        override fun onResponse(call: Call<List<Repo>>, response: Response<List<Repo>>) {
            hasMore = response.body()?.count() == 30
            repoAdapter.submitList(repoAdapter.currentList + response.body().orEmpty())
        }

        ...

    })
}
GithubService.kt
interface GithubService {
    @GET("users/{username}/repos")
    fun listRepos(@Path("username") username: String, @Query("page") page: Int): Call<List<Repo>>

    ...

}
다시 onScrolled() 메서드 내부에서 아이템의 개수 - 1이 마지막 아이템의 위치 값과 같으며, 30개로 맞아떨어져 이후 아이템이 더 있음을 조건으로 걸어준 뒤 내부에서 페이지를 늘리도록 지정해 주면 된다.
RepoActivity.kt
override fun onCreate(savedInstanceState: Bundle?) {

    ...

    binding.repoRecyclerView.addOnScrollListener(object: RecyclerView.OnScrollListener() {
        override fun onScrolled(recyclerView: RecyclerView, dx: Int, dy: Int) {
            super.onScrolled(recyclerView, dx, dy)

            val totalCount = linearLayoutManager.itemCount
            val lastVisiblePosition = linearLayoutManager.findLastVisibleItemPosition()

            if (lastVisiblePosition >= totalCount - 1 && hasMore) {

                page += 1
                listRepo(username, page)
            }
        }
    })

    listRepo(username, 0)
}
결과를 보면 페이징 처리가 잘 된 것을 볼 수 있다.
📔 해당 레포지토리 주소의 인터넷으로 이동
특정 사용자의 레포지토리 뷰를 클릭하면 해당 레포지토리 주소로 이동하도록 구현해 보자. 앞서 했던 것과 마찬가지로 RepoAdapter에 onClick 리스너를 달아준다.
RepoAdapter.kt
class RepoAdapter(
    val onClick: (Repo) -> Unit,
) : ListAdapter<Repo, RepoAdapter.RepoViewHolder>(diffUtil) {

    ...

    inner class RepoViewHolder(private val binding: ItemRepoBinding) : RecyclerView.ViewHolder(binding.root) {
        fun bind(item: Repo) {

           ...

            binding.root.setOnClickListener {
                onClick(item)
            }
        }
    }

    ...

}
RepoActivity에서 RepoAdapter의 생성자 부분을 수정해 준다. 여기서도 Intent를 사용하지만 Intent의 ACTION_VIEW를 통해 안드로이드 내장 브라우저를 호출하고 Uri.parse()의 인자로 앞서 받아온 htmlUrl을 넣어주면 된다. 이렇게 하면 해당 레포지토리의 주소로 이동하게 된다.
class RepoActivity : AppCompatActivity() {

    ...

    override fun onCreate(savedInstanceState: Bundle?) {

        ...

        repoAdapter = RepoAdapter {
            val intent = Intent(Intent.ACTION_VIEW, Uri.parse(it.htmlUrl))
            startActivity(intent)
        }

        ...
    }
}
📔전체 코드
https://github.com/Becomeproo/github_repository
📔마무리
이번 앱을 진행하며 확실히 이제 RecyclerView를 구현하는 데 있어서 혼란스럽거나 헷갈리는 점은 개선되었다는 것을 느낄 수 있었다. 또한 Retrofit을 사용해 데이터를 가져오는 순서에서 조금 어떤 식으로 동작되는지 이해가 되지 않았었지만 이번 앱을 통해 조금이나마 감을 잡을 수 있었다.