[Android] Part1-스톱워치 앱
아래 내용은 패스트 캠퍼스 [35개 프로젝트로 배우는 Android 앱 개발 feat. Jetpack Compose]의 강의 내용을 기반으로 작성한 자습 기록입니다.
📚스톱워치 앱
ℹ️앱 설명
스톱워치 앱으로 총 4개의 버튼(시작, 정지, 기록, 초기화)으로 구성되어 있다. 추가적으로 특정 시간을 지정하면 해당 시간의 카운트다운을 시작한 뒤 스톱워치를 시작할 수 있는 앱이다.
✅구현 기능
- 스톱워치 기능
- 0.1초마다 숫자 업데이트
- 시작, 일시정지, 정지
- 정지 전 다이얼로그 알림
- 시작 전 카운트다운 추가
- 카운트다운 3초 전 알림음
- 랩타임 기록
✅사용되는 기능
- UI
- ConstraintLayout
- ProgressBar
- Android
- AlertDialog
- Thread
- runOnUiThread
- ToneGenerator
- addView
📔UI 구현 - 스톱워치 UI 구현
먼저 중앙에 위치해 분과 초를 보여줄 텍스트 뷰를 하나 만들어 주었다. 중앙에서 조금 위쪽에 위치할 것이므로 제약을 상하좌우로 지정해 준 뒤에 app:layout_constraintVertical_bias 속성 값으로 “0.3”만큼 지정해 주었고 id 값을 “timeTextView”로 명명해 주었다.
“timeTextView” 오른쪽에는 10분의 1초 단위를 보여줄 텍스트 뷰를 하나 만들었다. 하단 제약으로 글자 아래쪽 부분에 맞게 위치하는 것이 보기 좋을 것 같아 app:layout_constraintBaseline_toBaselineOf 제약으로 “timeTextView”를 지정했다.
위 두 개의 텍스트 뷰들 하단에는 4개의 버튼이 위치한다. 각각 ‘시작’, ‘정지’, ‘기록’, ‘초기화’의 역할을 하는 버튼들이다. 우선 처음 보일 때의 화면에는 ‘시작’과 ‘초기화’ 버튼이 위치해 있어야 한다. 여기서 각각의 버튼을 의미하는 적절한 이미지를 drawable에 저장해 두었다. 먼저 수평 속성의 가이드라인을 생성해 app:layout_constraintGuide_percent 속성 값으로 “0.6”을 지정해 주었다.
‘시작’, ‘초기화’ 버튼을 양쪽 끝에 제약을 지정한 뒤, 상단과 하단 제약을 가이드라인으로 지정하면 가이드라인 위 중앙에 위치한다. 여기서 ‘시작’ 버튼을 오른쪽에 위치할 것이므로 app:layout_constraintHorizontal_bias 값으로 “0.7”을, ‘초기화’ 버튼은 왼쪽에 위치할 것이므로 같은 속성으로 “0.3”만큼 지정해 주었다. ‘시작’ 버튼을 누르면, 기존의 두 버튼은 각각 ‘정지’와 ‘기록’ 버튼으로 변경되어야 한다. 따라서 두 개의 버튼을 추가로 생성하여 ‘정지’ 버튼은 색상과 이미지 값을 제외하고 ‘시작’ 버튼과 똑같은 속성 값을 지정해 주었다. ‘기록’ 버튼 또한 위와 마찬가지로 ‘초기화’ 버튼과 똑같이 해주었다.
“timeTextView”의 상단에는 카운트다운을 위한 기능을 할 텍스트 뷰들과 카운트다운을 시각적으로 잘 표시하기 위해 Progressbar를 만들어 주었다.
기본값으로 지정되어 있는 Progressbar는 시각적으로 표시하기에는 적절하지 못하므로 style 속성의 값을 “@style/Widget.AppCompat.ProgressBar.Horizontal”로 지정해 더 쉽게 알아볼 수 있도록 해주었다.
Progressbar 상단에는 카운트다운을 명시하는 텍스트 뷰와 카운트다운의 단위를 나타내는 텍스트 뷰, 그리고 몇 초의 카운트다운을 지정할지 선택할 수 있도록 하는 텍스트 뷰를 구현해 주었다.
마지막으로 ‘기록’ 버튼을 누를 때마다 당시의 기록들을 보여주는 기능을 할 뷰를 구현해 주어야 한다.
먼저, ‘기록’ 버튼을 누를 때마다 해당되는 기록들은 누적되어 보이게 된다. 따라서 여러 번 해당 동작을 실행했을 경우 스크롤을 통해 저장된 기록들을 볼 수 있도록 ScrollView를 만들어 주었다. ScrollView는 가이드라인 아래에서 보일 수 있도록 제약을 지정해 주었다. 이후 ScrollView 내부에 수직 속성의 LinearLayout을 만들어 주었다. LinearLayout 내부에는 해당되는 기록이 표시되는 텍스트 뷰를 넣어줄 예정이다.
위에서 설명한 내용들을 코드로 보면 다음과 같다.
📖activity_main.xml
<?xml version="1.0" encoding="utf-8"?>
<androidx.constraintlayout.widget.ConstraintLayout xmlns:android="http://schemas.android.com/apk/res/android"
    xmlns:app="http://schemas.android.com/apk/res-auto"
    xmlns:tools="http://schemas.android.com/tools"
    android:layout_width="match_parent"
    android:layout_height="match_parent"
    tools:context=".MainActivity">

    <TextView
        android:id="@+id/countdownTextView"
        android:layout_width="wrap_content"
        android:layout_height="wrap_content"
        android:text="00"
        android:textSize="50sp"
        app:layout_constraintBottom_toTopOf="@id/countdownProgressbar"
        app:layout_constraintEnd_toEndOf="parent"
        app:layout_constraintStart_toStartOf="parent" />

    <TextView
        android:id="@+id/countdownTitleTextView"
        android:layout_width="wrap_content"
        android:layout_height="wrap_content"
        android:layout_marginEnd="8dp"
        android:text="카운트다운"
        app:layout_constraintBottom_toBottomOf="@id/countdownTextView"
        app:layout_constraintEnd_toStartOf="@id/countdownTextView"
        app:layout_constraintTop_toTopOf="@id/countdownTextView" />

    <TextView
        android:id="@+id/countdownUnitTextView"
        android:layout_width="wrap_content"
        android:layout_height="wrap_content"
        android:layout_marginStart="8dp"
        android:text="초"
        app:layout_constraintBaseline_toBaselineOf="@id/countdownTextView"
        app:layout_constraintStart_toEndOf="@id/countdownTextView"
        app:layout_constraintTop_toTopOf="@id/countdownTextView" />

    <ProgressBar
        android:id="@+id/countdownProgressbar"
        style="@style/Widget.AppCompat.ProgressBar.Horizontal"
        android:layout_width="0dp"
        android:layout_height="wrap_content"
        android:layout_marginBottom="30dp"
        app:layout_constraintBottom_toTopOf="@id/timeTextView"
        app:layout_constraintEnd_toEndOf="parent"
        app:layout_constraintStart_toStartOf="parent" />

    <TextView
        android:id="@+id/timeTextView"
        android:layout_width="wrap_content"
        android:layout_height="wrap_content"
        android:text="00:00"
        android:textSize="120sp"
        app:layout_constraintBottom_toBottomOf="parent"
        app:layout_constraintEnd_toEndOf="parent"
        app:layout_constraintStart_toStartOf="parent"
        app:layout_constraintTop_toTopOf="parent"
        app:layout_constraintVertical_bias="0.3" />

    <TextView
        android:id="@+id/tickTextView"
        android:layout_width="wrap_content"
        android:layout_height="wrap_content"
        android:layout_marginStart="8dp"
        android:text="0"
        android:textSize="30sp"
        app:layout_constraintBaseline_toBaselineOf="@id/timeTextView"
        app:layout_constraintStart_toEndOf="@id/timeTextView" />

    <androidx.constraintlayout.widget.Guideline
        android:id="@+id/guideline"
        android:layout_width="wrap_content"
        android:layout_height="wrap_content"
        android:orientation="horizontal"
        app:layout_constraintGuide_percent="0.6" />

    <com.google.android.material.floatingactionbutton.FloatingActionButton
        android:id="@+id/startButton"
        android:layout_width="wrap_content"
        android:layout_height="wrap_content"
        android:backgroundTint="@color/green"
        android:src="@drawable/ic_baseline_play_arrow_24"
        app:layout_constraintBottom_toBottomOf="@id/guideline"
        app:layout_constraintEnd_toEndOf="parent"
        app:layout_constraintHorizontal_bias="0.7"
        app:layout_constraintStart_toStartOf="parent"
        app:layout_constraintTop_toTopOf="@id/guideline" />

    <com.google.android.material.floatingactionbutton.FloatingActionButton
        android:id="@+id/stopButton"
        android:layout_width="wrap_content"
        android:layout_height="wrap_content"
        android:backgroundTint="@color/red"
        android:src="@drawable/ic_baseline_stop_24"
        app:layout_constraintBottom_toBottomOf="@id/guideline"
        app:layout_constraintEnd_toEndOf="parent"
        app:layout_constraintHorizontal_bias="0.3"
        app:layout_constraintStart_toStartOf="parent"
        app:layout_constraintTop_toTopOf="@id/guideline" />

    <com.google.android.material.floatingactionbutton.FloatingActionButton
        android:id="@+id/pauseButton"
        android:layout_width="wrap_content"
        android:layout_height="wrap_content"
        android:backgroundTint="@color/yellow"
        android:src="@drawable/ic_baseline_pause_24"
        android:visibility="gone"
        app:layout_constraintBottom_toBottomOf="@id/guideline"
        app:layout_constraintEnd_toEndOf="parent"
        app:layout_constraintHorizontal_bias="0.7"
        app:layout_constraintStart_toStartOf="parent"
        app:layout_constraintTop_toTopOf="@id/guideline" />

    <com.google.android.material.floatingactionbutton.FloatingActionButton
        android:id="@+id/lapButton"
        android:layout_width="wrap_content"
        android:layout_height="wrap_content"
        android:backgroundTint="@color/blue"
        android:src="@drawable/ic_baseline_check_24"
        android:visibility="gone"
        app:layout_constraintBottom_toBottomOf="@id/guideline"
        app:layout_constraintEnd_toEndOf="parent"
        app:layout_constraintHorizontal_bias="0.3"
        app:layout_constraintStart_toStartOf="parent"
        app:layout_constraintTop_toTopOf="@id/guideline" />

    <ScrollView
        android:id="@+id/lapScrollView"
        android:layout_width="0dp"
        android:layout_height="0dp"
        android:layout_marginTop="50dp"
        android:padding="16dp"
        app:layout_constraintBottom_toBottomOf="parent"
        app:layout_constraintEnd_toEndOf="parent"
        app:layout_constraintStart_toStartOf="parent"
        app:layout_constraintTop_toBottomOf="@id/guideline">

        <LinearLayout
            android:id="@+id/lapContainerLinearLayout"
            android:layout_width="match_parent"
            android:layout_height="wrap_content"
            android:orientation="vertical" />

    </ScrollView>

</androidx.constraintlayout.widget.ConstraintLayout>
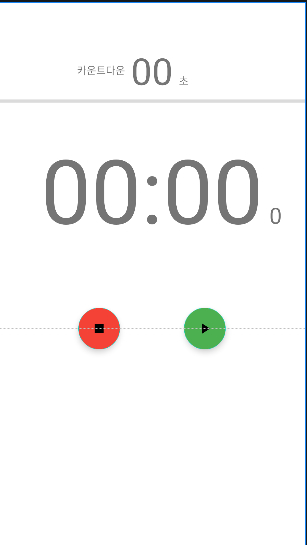
위 코드의 결과는 다음과 같다.
📔기능 구현 - 각 버튼 클릭 시 이벤트
UI의 값들을 가져오는 방법은 뷰 바인딩을 사용하였다.
먼저 각각의 버튼을 눌렀을 때 기능들이 실행되어야 하므로 버튼들에 리스너를 구현해 주었다. 또한 각 버튼을 눌렀을 때 호출할 메서드들 또한 정의해 주었다.
📖MainActivity.kt
class MainActivity : AppCompatActivity() {

        ...

    override fun onCreate(savedInstanceState: Bundle?) {
        ...

        binding.startButton.setOnClickListener {
          start()
        }
        binding.stopButton.setOnClickListener {
          stop()
        }
        binding.pauseButton.setOnClickListener {
          pause()
        }
        binding.lapButton.setOnClickListener {
          lap()
        }
    }

    private fun start() {}

    private fun stop() {}

    private fun pause() {}

    private fun lap() {}
}
각각의 버튼을 클릭했을 때, 해당되는 기능을 할 버튼들은 보이도록 하고, 기능이 없는 버튼은 보이지 않도록 설정해 보자.
먼저 ‘시작’ 버튼을 누른 다음에는 ‘정지’와 ‘기록’의 기능을 수행해야 하기 때문에 각각의 기능에 해당하는 버튼들을 위치시켜 주어야 한다. 따라서 ‘시작’ 버튼과 ‘초기화’ 버튼은 보이지 않도록, ‘정지’와 ‘기록’ 버튼은 보이도록 해주어야 한다.
binding.startButton.setOnClickListener {
    start()
    binding.startButton.isVisible = false
    binding.stopButton.isVisible = false
    binding.pauseButton.isVisible = true
    binding.lapButton.isVisible = true
}
나머지 버튼들도 위와 같은 방식으로 설정해 주도록 한다.
binding.stopButton.setOnClickListener {
    stop()
    binding.startButton.isVisible = true
    binding.stopButton.isVisible = true
    binding.pauseButton.isVisible = false
    binding.lapButton.isVisible = false
}
binding.pauseButton.setOnClickListener {
    pause()
    binding.startButton.isVisible = true
    binding.stopButton.isVisible = true
    binding.pauseButton.isVisible = false
    binding.lapButton.isVisible = false
}
binding.lapButton.setOnClickListener {
    lap()
}
📔기능 구현 - 초기화 다이얼로그
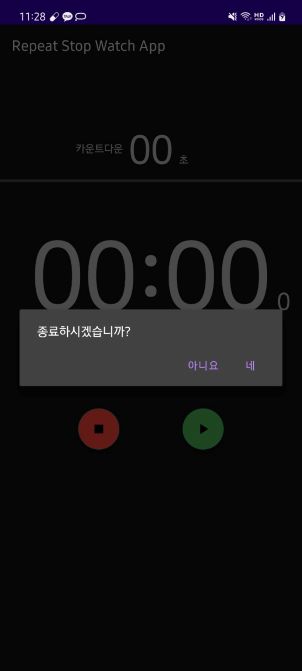
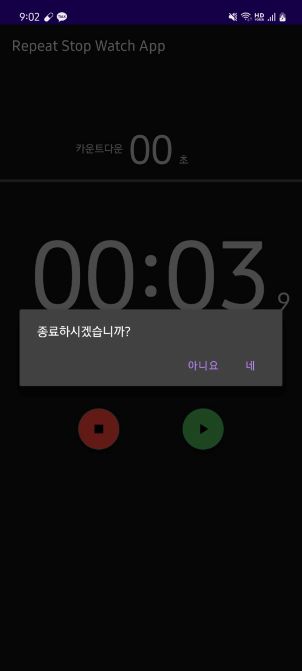
Stop() 메서드에 대해 먼저 구현해 보자. 초기화 버튼이 눌렸을 때에는 다이얼로그를 띄워 사용자에게 현재까지 기록된 내용들을 종료할지에 대해 선택 내용을 검토할 수 있도록 도움을 줄 수 있도록 한다.
다이얼로그를 구현하기 위해 먼저 showAlertDialog() 메서드를 생성해 주었다. 다이얼로그를 생성하기 위해서는 Builder가 필요하다. Builder에 현재 액티비티의 컨텍스트를 인자로 넣어주었고, 다이얼로그의 setMessage()의 인자로 종료할지에 대해 다시 묻는 내용과 setPositiveButton()과 setNegativeButton()을 만들어 ‘네’ 또는 ‘아니요’를 클릭했을 때에 대한 처리를 해주었다. 여기서 ‘네’를 클릭했을 때 stop() 메서드가 호출되도록 해주었다. 마지막으로 잊지 않고 show()를 호출해야 다이얼로그가 화면에 보인다.
📖MainActivity.kt
private fun showAlertDialog() {
    AlertDialog.Builder(this).apply {
        setMessage("종료하시겠습니까?")
        setPositiveButton("네") { _, _ ->
            stop()
        }
        setNegativeButton("아니요", null)
    }.show()
}
다이얼로그를 구현한 메서드는 ‘초기화’ 버튼이 눌렸을 때 실행되어야 하므로 기존의 stop() 메서드는 다이얼로그에서 실행되기 때문에 지우고 그 자리에 해당 메서드를 넣어주었다.
binding.stopButton.setOnClickListener {
    showAlertDialog()
}
실행을 하면 다이얼로그가 잘 구현된 것을 볼 수 있다.
📔기능 구현 - 카운트다운 시간 지정
카운트다운 시간을 지정하는 방법은 다음과 같다.
“countdownTextView”를 클릭하였을 때, 시간을 선택할 수 있는 다이얼로그를 띄우길 원하므로 텍스트 뷰에 클릭 리스너를 지정해 주었고 리스너 내부에 다이얼로그를 출현시키기 위한 메서드를 지정해 주었다. 또한 선택된 시간을 저장할 수 있는 속성을 만들어 초깃값으로 10을 지정해 주었다.
📖MainActivity.kt
class MainActivity : AppCompatActivity() {

    ...

    private var countdownSecond = 10

    override fun onCreate(savedInstanceState: Bundle?) {

        ...

        binding.countdownTextView.setOnClickListener {
            showCountdownSettingDialog()
        }
        ...
    }
    ...
}
이제 시간을 선택할 수 있는 다이얼로그를 구현해 보자. showCountdownSettingDialog() 메서드 내에서 위에서와 마찬가지로 다이얼로그를 생성해 준다. 이후 시간을 선택하는 방법으로는 NumberPicker를 사용할 것이기 때문에 새로운 레이아웃 xml 파일을 하나 만들어 주었다. 해당 레이아웃 파일의 구조는 다음과 같다.
📖 dialog_countdown_setting.xml
<?xml version="1.0" encoding="utf-8"?>
<androidx.constraintlayout.widget.ConstraintLayout xmlns:android="http://schemas.android.com/apk/res/android"
    xmlns:app="http://schemas.android.com/apk/res-auto"
    android:layout_width="match_parent"
    android:layout_height="match_parent">

    <NumberPicker
        android:id="@+id/countdownSecondPicker"
        android:layout_width="wrap_content"
        android:layout_height="wrap_content"
        app:layout_constraintBottom_toBottomOf="parent"
        app:layout_constraintEnd_toEndOf="parent"
        app:layout_constraintStart_toStartOf="parent"
        app:layout_constraintTop_toTopOf="parent" />

    <TextView
        android:layout_width="wrap_content"
        android:layout_height="wrap_content"
        android:layout_marginStart="8dp"
        android:text="초"
        app:layout_constraintBottom_toBottomOf="@id/countdownSecondPicker"
        app:layout_constraintStart_toEndOf="@id/countdownSecondPicker"
        app:layout_constraintTop_toTopOf="@id/countdownSecondPicker" />

</androidx.constraintlayout.widget.ConstraintLayout>
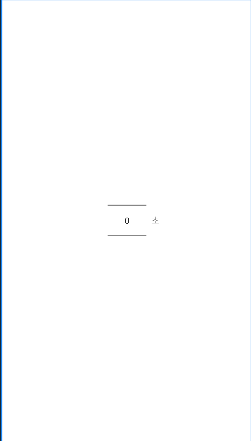
다시 MainActivity 파일로 돌아와 생성한 레이아웃 파일을 뷰 바인딩 해주었다. 이후 해당 레이아웃 내부의 NumberPicker의 최댓값과 최솟값을 지정해 주었고, 초깃값으로 위에서 선언해둔 속성인 coundownSecond를 대입하였다.
📖MainActivity.kt
private fun showCountdownSettingDialog() {
    AlertDialog.Builder(this).apply {
        val dialogBinding = DialogCountdownSettingBinding.inflate(layoutInflater)
        with(dialogBinding.countdownSecondPicker) {
            maxValue = 20
            minValue = 0
            value = countdownSecond
        }
    }
}
이후 setTitle()을 사용해 다이얼로그의 제목을 지정했고, setView()를 활용하여 레이아웃을 표시할 수 있도록 했다. 위에서도 사용되었던 setPositiveButton()은 “확인”을 클릭할 경우 선택된 시간의 데이터를 업데이트하고, 텍스트 뷰에 해당 데이터를 표시하도록 해주었다. 여기서 텍스트 뷰가 표시되는 형식은 “01”, “02”, “10”과 같이 한 자릿수의 시간이더라도 0이 붙은 형식으로 지정해 주었다. setNegativeButton()은 위의 다이얼로그에서의 사용과 같다.
마지막으로 잊지 않고 show()를 적어주자.
private fun showCountdownSettingDialog() {
    AlertDialog.Builder(this).apply {
        val dialogBinding = DialogCountdownSettingBinding.inflate(layoutInflater)
        with(dialogBinding.countdownSecondPicker) {
            maxValue = 20
            minValue = 0
            value = countdownSecond
        }

        setTitle("카운트다운 설정")
        setView(dialogBinding.root)
        setPositiveButton("확인") { _, _ ->
            countdownSecond = dialogBinding.countdownSecondPicker.value
            binding.countdownTextView.text = String.format("%02d", countdownSecond)
        }
        setNegativeButton("취소", null)
    }.show()
}
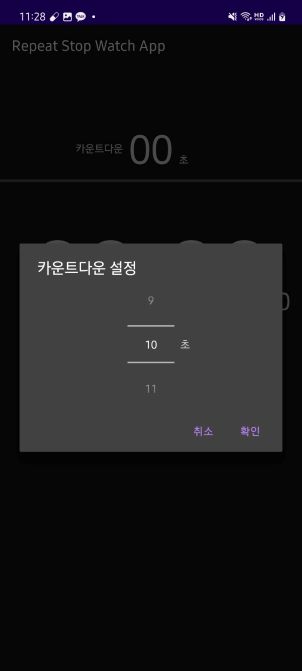
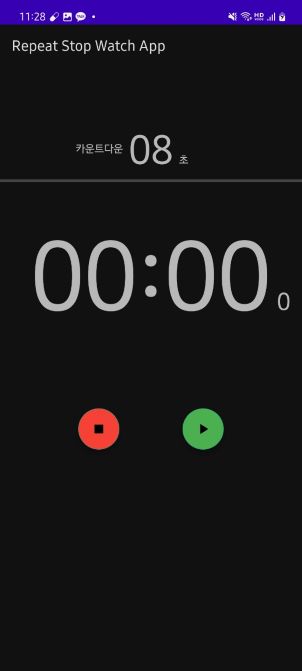
카운트다운 다이얼로그까지 구현한 후 실행시키면 다음과 같이 실행되는 것을 볼 수 있다.
📔기능 구현 - 시간 시작 기능 구현
“startButton”을 클릭하여 타이머를 시작하는 것을 구현해 보자. 타이머 동작은 메인스레드가 아닌 workerThread에서 기능하도록 구현해야 하므로 Thread를 사용하도록 한다. Thread에 대한 정리는 나중에 자세히 다루도록 한다.
start() 메서드에서 타이머 객체를 구현한다. 이후 타이머를 pause() 메서드를 통해 “pauseButton”을 누르면 정지할 경우도 생각해서 클래스 전역 변수로 timer 변수를 먼저 만들어 주었다. 또한 0.1초마다의 값을 저장해야 하기 때문에 currentDeciSecond라는 이름의 변수를 0으로 초기화해주었다.
private var currentDeciSecond = 0
private var timer: Timer? = null
다시 start() 메서드로 돌아와서 타이머를 설정해 준다. 먼저 timer에는 두 가지 매개변수 값을 사용한다. initialDelay의 값, 즉 초기 지연 값은 0을 주었고, period, 타이머가 동작하는 간격으로 매개변수가 밀리 세컨드(1000분의 1초) 값을 기본으로 하기 때문에 0.1초가 될 수 있도록 100을 지정해 주었다. timer 내부에는 0.1초마다 값이 증가해야 하기 때문에 앞서 지정했던 currentDeciSecond 변숫값을 1씩 증가시키도록 했다. 다음으로 텍스트 뷰의 분, 초 단위의 값을 출력하기 위해 분 단위의 값은 (현재 0.1초 단위의 값 / 10) / 60을 하면 분이 나오고, (현재 0.1초 단위의 값 / 10) % 60을 하면 초 단위의 값이 나온다. 따라서 위의 식들을 적용하여 각각 minutes, seconds 변수에 지정해 주었다. 0.1초 단위의 값 또한 출력하기 때문에 (현재 0.1초 단위의 값 % 10)의 값을 deciSeconds 변수에 지정했다.
private fun start() {
    timer = timer(initialDelay = 0, period = 100) {
        currentDeciSecond += 1

        val minutes = currentDeciSecond.div(10) / 60
        val seconds = currentDeciSecond.div(10) % 60
        val deciSeconds = currentDeciSecond % 10


        binding.timeTextView.text = String.format("%02d:%02d", minutes, seconds)
        binding.tickTextView.text = deciSeconds.toString()
    }
}
이후 출력되는 값을 텍스트 뷰에 지정한 뒤의 실행 결과…
⚠️오류
실행 결과로 오류가 발생한다. 오류의 내용을 보니 다음과 같은 에러 내용을 출력한다.
Process: com.example.repeatstopwatchapp, PID: 10748
                                                                                    android.view.ViewRootImpl$CalledFromWrongThreadException: Only the original thread that created a view hierarchy can touch its views.
위 오류의 내용은 UI의 구현이 메인 스레드에서 이루어지지 않았다는 의미이다. 앞서 말했듯이 메인 스레드 이외의 스레드에서의 UI 구현은 오류를 발생시킨다. 따라서 UI가 구현된 부분의 코드를 메인 스레드에서 동작하도록 구현해 주어야 한다.
💡해결
다른 스레드에서 메인 스레드 동작을 구현하는 방법은 몇 가지가 있는데, 그중에서 runOnUiThread를 통해 오류를 해결해 보자. 방법은 아주 간단하다. 구현될 UI의 코드 부분을 runOnUiThread로 감싸면 된다.
private fun start() {
    timer = timer(initialDelay = 0, period = 100) {
        ...

        runOnUiThread {
            binding.timeTextView.text = String.format("%02d:%02d", minutes, seconds)
            binding.tickTextView.text = deciSeconds.toString()
        }
    }
}
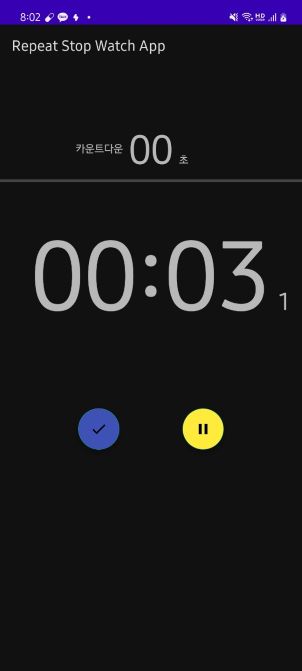
위와 같이 코드를 감싸주면 workerThread에서 UI를 작성할 때 해당 UI 코드가 메인 스레드에서 작동된다. 이후 실행해 보면 시간이 아주 잘 흐르는 것을 볼 수 있다.
📔기능 구현 - 시간 정지 기능 구현
다음으로 시간을 정지하는 기능을 구현해 보자. 어렵지 않았다. pause() 메서드에서 앞서 클래스 변수로 지정해 주었던 timer 변수의 cancel() 메서드를 사용하면 타이머를 정지시킬 수 있다. 이와 같이 타이머 객체를 null 처리 시켜주었다.
💡 궁금증
여기서 타이머 객체를 왜 null 처리를 해야 할까? 라는 생각이 들었다. 분명 정지된 이후 재개할 때 다시 쓰일 텐데 null 처리를 한다는 점이 이해가 되지 않았다. 따라서 이 부분에서 왜 이런 처리를 하는지 집고 넘어가 보자.
여기저기서 찾아본 결과, 다음과 같은 결론에 이르렀다.
timer를 null로 설정하게 되면, 가비지 컬렉션에 효과적으로 값이 수집되도록 해준다. 만약 null로 해주지 않는다면, 정지된 이후에도 타이머는 계속해서 남아서 진행한다. 또한 이후에start()메서드나 이외의 메서드를 실행할 때마다 여러 개의 Timer 객체가 만들어지게 되고 사용되지 않는 Timer 객체는 누적된다. 이 과정에서 해당 객체들은 가비지 컬렉션에 의해 수집되고 이런 식으로 불필요한 가비지들이 계속 쌓이게 되면, 잠재적으로 메모리 누수(메모리 릭) 및 예기치 않은 성능 문제를 초래하게 된다. 따라서 Timer 객체를 실행해 준 뒤, null 값으로 처리해 주면 위의 내용들을 방지할 수 있게 되고 이는 가능한 한 빨리 가비지 수집이 이루어지도록 도와주며, 앱이 사용할 메모리 리소스를 확보할 수 있게 해준다.
여기서 한 가지 착각을 한 점이 있는데, null 값으로 지정하면 타이머가 객체가 사라지고, 진행되던 시간 또한 취소된다고 생각했다. 나중에 복습하면서 또 헷갈릴 것이 분명한 나를 위해 설명해 주도록 한다. 아무 관계없다. 타이머 객체만 사라질 뿐, 진행 중이던 시간은 온전히currentDeciSecond에 저장되는 것을 왜 잊고 있는가…
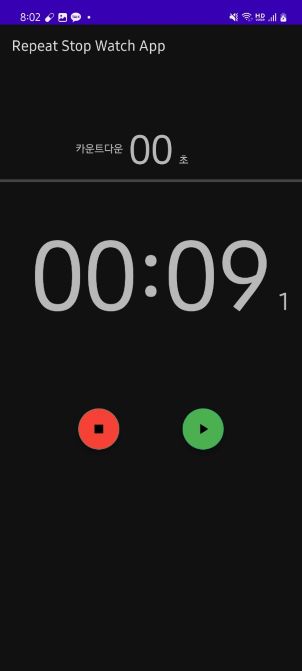
궁금증도 해결되었으니 다시 본론으로 돌아와 진행해 보자. 따라서 위의 코드들을 적용시키면 정지 기능이 동작하게 된다.
private fun pause() {
    timer?.cancel()
    timer = null
}
📔기능 구현 - 초기화 기능 구현
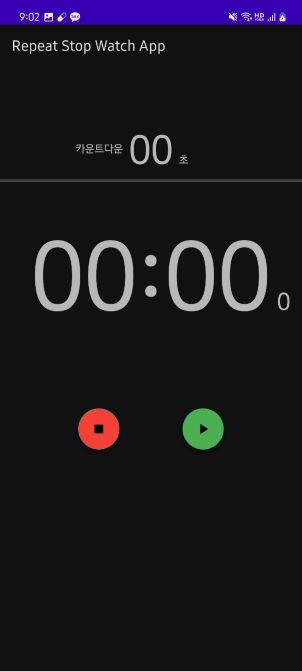
다음으로 초기화 기능을 구현시켜 보자. stop() 메서드에서 “currentDeciSecond” 변수의 값을 0으로 바꾸어 준다. 타이머 객체가 null이 될 때가 아닌 바로 여기서 시간은 초기화된다. 또한 텍스트 뷰의 값들도 모두 초기화 시켜주자.
private fun stop() {
    binding.startButton.isVisible = true
    binding.stopButton.isVisible = true
    binding.pauseButton.isVisible = false
    binding.lapButton.isVisible = false

    currentDeciSecond = 0
    binding.timeTextView.text = "00:00"
    binding.tickTextView.text = "0"
}
📔기능 구현 - 카운트다운 기능 구현
카운트다운이 진행되는 구체적인 값을 알기 위해 클래스 변수로 “currentCountdownDeciSecond”를 지정해 주었다. 해당 변수에 지정된 카운트다운 시간의 10을 곱해주었다.
private var currentCountdownDeciSecond = countdownSecond * 10
위는 초깃값이고 카운트다운 시간이 지정되었을 때 해당 값을 같이 업데이트하기 위해 시간이 지정될 때 같이 설정되도록 추가해 준다.
private fun showCountdownSettingDialog() {
    AlertDialog.Builder(this).apply {

        ...

        setPositiveButton("확인") { _, _ ->
            countdownSecond = dialogBinding.countdownSecondPicker.value
            currentCountdownDeciSecond = countdownSecond * 10
            binding.countdownTextView.text = String.format("%02d", countdownSecond)
        }
        setNegativeButton("취소", null)
    }.show()
}
카운트다운 기능은 시간은 지정하고 난 뒤 “startButton”을 클릭해야 시작하므로 start() 메서드에 구현해야 한다. 여기서 위에서 미리 작성되어 있던 코드들은 카운트다운의 시간이 0이 되어야 시작되므로 0이 되었을 때의 조건문 내부로 옮겨주었다. 따라서 카운트다운 기능은 else문 내부에 작성된다. else문 내부에서, 카운트다운은 시간이 줄어들어야 하기 때문에 “currentCountdownDeciSecond”의 값을 1씩 줄여주도록 한다.
줄어드는 시간을 UI에 출력하기 위해 second와 progress 변수를 만들었고, 각각 (현재 0.1초 단위의 값 / 10)과 (현재 0.1초 단위의 값 / (지정된 카운트다운 시간 * 10) * 100)을 지정해 주었다. 여기서 초를 나타내는 식은 위에서 초를 지정했던 식과 다르다. 앞서 작성했던 식은 분과 초로 이루어져 있지만, 이번에는 초 단위로만 나타내기 때문에 / 10 만 해주어도 된다. 또한 progress를 나타내는 식은 점차 줄어드는 시간을 시각적으로 표현하기 때문에 백분율로 나타내 준다. 여기서 Int와 Int 간의 계산은 1보다 작게 될 때부터 0으로 나온다. 따라서 10을 Float형으로 지정해 계산이 Float 자료형으로 처리되게 해주었다.
위에서 나타낼 값들을 정의해 주었다면, UI로 출력하도록 한다. 위에서는 runOnUiThread를 사용했지만 이번에는 다른 방법으로 뷰에서 post하는 방식으로 나타내보자. 어떤 뷰를 지정해도 상관없기 때문에 root로 지정해서 post를 해주었다. 결과는 runOnUiThread와 동일하게 UI를 구현할 수 있게 해준다.
private fun start() {
    timer = timer(initialDelay = 0, period = 100) {
        if (currentCountdownDeciSecond == 0) {
            currentDeciSecond += 1

            val minutes = currentDeciSecond.div(10) / 60
            val seconds = currentDeciSecond.div(10) % 60
            val deciSeconds = currentDeciSecond % 10

            runOnUiThread {
                binding.timeTextView.text = String.format("%02d:%02d", minutes, seconds)
                binding.tickTextView.text = deciSeconds.toString()
                binding.countdownGroup.isVisible = false
            }
        } else {
            currentCountdownDeciSecond -= 1
            val seconds = currentCountdownDeciSecond / 10
            val progress = (currentCountdownDeciSecond / (countdownSecond * 10f)) * 100

            binding.root.post {
                binding.countdownTextView.text = String.format("%02d", seconds)
                binding.countdownProgressbar.progress = progress.toInt()
            }
        }
    }
}
이후 처음 초기화되었을 때 10초로 지정되어서 나와야 하기 때문에 텍스트 뷰의 값들을 업데이트해주었다.
override fun onCreate(savedInstanceState: Bundle?) {

    ...

    initCountdownViews()
}

private fun initCountdownViews() {
    binding.countdownTextView.text = String.format("%02d", countdownSecond)

    binding.countdownProgressbar.progress = 100
}
또한 카운트다운이 완료하고 난 후에 카운트다운이 보이는 UI를 표시할 필요가 없기 때문에 해당 기능에 해당되는 뷰 위젯들을 그룹으로 묶어 카운트다운이 종료되었을 때 gone 처리해 주도록 하였다. 그리고 타이머가 초기화되었을 때 다시 보여야 하므로 stop() 메서드에서 다시 보이도록 처리해 주었다.
📖activity_main.xml
<androidx.constraintlayout.widget.Group
    android:id="@+id/countdownGroup"
    android:layout_width="wrap_content"
    android:layout_height="wrap_content"
    app:constraint_referenced_ids="countdownTitleTextView,countdownUnitTextView,countdownTextView,countdownProgressbar" />
📖MainActivity.kt
private fun start() {
    timer = timer(initialDelay = 0, period = 100) {
        if (currentCountdownDeciSecond == 0) {

            ...

            runOnUiThread {

                ...

                binding.countdownGroup.isVisible = false
            }
        } else {

            ...

        }
    }
}

private fun stop() {

    ...

    binding.countdownGroup.isVisible = true
    initCountdownViews()
}
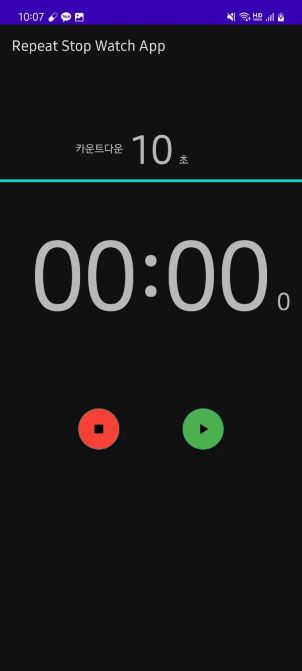
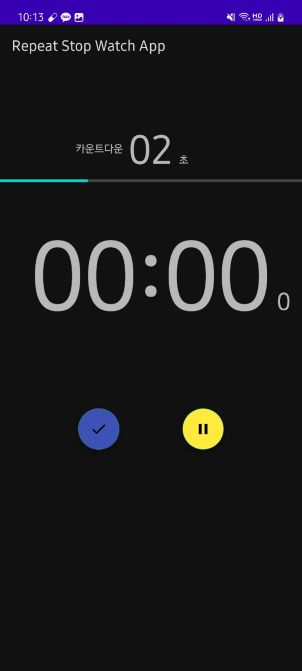
결과 화면을 보면, 초기에 나오는 값이 10으로 설정되어 있는 것을 볼 수 있고, 카운트다운 기능 또한 잘 구현되는 것을 볼 수 있다.
📔기능 구현 - 기록 기능 구현
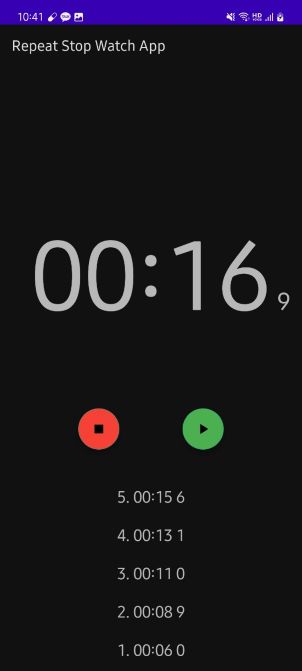
기록 기능을 위해서 lap() 메서드를 구현해 보자. 먼저 카운트다운이 진행될 동안에는 기록 기능이 동작해선 안되므로 예외 처리를 해주었다. 그리고 기록들은 스크롤 뷰의 레이아웃 내에 간단한 텍스트 뷰로 표시되므로 이번에는 xml에서가 아닌 코드로 뷰를 작성해 보도록 한다.
우선 컨테이너로 스크롤 뷰 내부의 레이아웃을 가져왔다. 해당 컨테이너는 나중에 기록 기능이 완료된 이후에 addView()를 통해 텍스트 뷰들을 출력할 예정이다. 그전에 먼저 텍스트 뷰를 정의해 보자. 코드로 TextView를 구현하기 위해 현재 컨텍스트가 지정된 텍스트 뷰를 생성해 주고 확장 함수를 사용해 속성들을 내부에 정의한다. 여기서 텍스트 속성값을 지정하기 위해 위에서 했던 방식으로 분, 초, 0.1 단위 초를 가져와 적용해 준다. 이 과정에서 표시될 기록들의 순서를 쉽게 보기 위해 컨테이너의 childCount를 가져와 인덱스로 지정해 주었다. childCount는 컨테이너 내부에 등록된 뷰들의 개수를 보여준다. 속성값이 적용된 텍스트 뷰를 앞서 언급했던 대로 컨테이너의 addView()의 인자로 넣어주었다.
이후 초기화 기능이 동작하면 누적됐던 기록들을 모두 초기화해주기 위해 stop() 메서드에서 removeAllViews()를 사용했다.
private fun stop() {

    ...

    binding.lapContainerLinearLayout.removeAllViews()
}

private fun lap() {
    if(currentDeciSecond == 0) return

    val container = binding.lapContainerLinearLayout
    TextView(this).apply {
        textSize = 20f
        gravity = Gravity.CENTER
        val minutes = currentDeciSecond.div(10) / 60
        val seconds = currentDeciSecond.div(10) % 60
        val deciSecond = currentDeciSecond % 10
        text = container.childCount.inc().toString() + ". " + String.format(
            "%02d:%02d %01d",
            minutes,
            seconds,
            deciSecond
        )
        setPadding(30)
    }.let { lapTextView ->
        container.addView(lapTextView, 0)
    }
}
📔기능 구현 - 카운트다운 소리 기능 구현
마지막으로 카운트다운 시간이 3초 이내가 되면 소리를 출력하여 사용자가 스톱워치가 시작된다는 것을 더 효율적으로 인지할 수 있게 해보자. 소리를 내는 방법으로는 ToneGenerator를 사용하였다.
소리가 나야 하려면 동시에 세 가지 조건을 충족해야 한다. 조건은 아래와 같다.
- “currentDeciSecond”의 값이 0
- “currentCountdownDeciSecond”의 값이 30이하(0.1초 단위이므로)
- 3초, 2초, 1초에 맞게 소리가 구현되어야 함
따라서 위의 조건을 충족시키기 위해서 아래와 같이 조건식을 작성하였다. 코드는 시작 버튼을 누른 후에 실행되어야 하기 때문에 start() 메서드 내부에 작성해 주었다.
if (currentDeciSecond == 0 && currentCountdownDeciSecond < 31 && currentCountdownDeciSecond % 10 == 0)
조건식 내부에 3초가 남았을 때부터 내는 소리와 시작을 알리는 소리를 달리하기 위해 조건식을 통해 변수를 지정해 주었다. 변수로 지정될 값들은 ToneGenerator에서 기본적으로 제공하는 소릿값 들이다. 인자 값으로 알람 타입을 지정해 주고, 소리는 최대로 출력될 수 있도록 해주었다. 모든 설정을 마친 후 startTone()을 사용하여 출력할 소리의 종류와 소리가 지속될 시간으로 소리가 출력되도록 한다.
private fun start() {
    timer = timer(initialDelay = 0, period = 100) {

        ...

        if (currentDeciSecond == 0 && currentCountdownDeciSecond < 31 && currentCountdownDeciSecond % 10 == 0) {
            val toneType =
                if (currentCountdownDeciSecond == 0) ToneGenerator.TONE_CDMA_HIGH_L else ToneGenerator.TONE_CDMA_ANSWER
            ToneGenerator(AudioManager.STREAM_ALARM, ToneGenerator.MAX_VOLUME)
                .startTone(toneType, 100)
        }
    }
}
실행 결과 잘 구현된 것을 확인할 수 있었다.
📔전체 코드
https://github.com/Becomeproo/stopwatch
📔마무리
이번 앱을 학습하면서 스레드에 대해서 좀 더 자세히 알 수 있었다. 스레드 내부에서 루퍼와 핸들러, 그리고 workerThread 간의 동작이 이해가 되지 않았는데, 루퍼와 workerThread의 동작들이 핸들러를 거치는 점, 루퍼가 주기적으로 메인 스레드 내에서 계속해서 작업 내용들을 확인한다는 것을 배울 수 있었다. 스레드를 다루기만 하면 괜히 겁부터 먹곤 했지만, 차근차근 친해져보도록 해야겠다.